The Plant Nanny - Part One
Feb 20, 2014
I have a plant in my office at work and when I got to work one Monday morning after a long weekend the poor thing was all droopy and sad looking. That's when I got this crazy idea to build an automatic plant watering device. In part one we'll take a look at the basic setup and do some monitoring. BTW, you can buy a simple one on Amazon for about $30, but what fun would that be? 
In this project I'll give you a step-by-step description of how I developed the Plant Nanny. Each section will discuss a single feature and give you the code for that feature, it will build on the previous sections and just show the new code. By the end you will have a fully function project.
Moisture Sensors
 The first step in this project was to research moisture sensors. As it turns out they're pretty easy to use, just three wires: power, ground, and an analog voltage (between 0 and 2.3 volts) that indicates the moisture level of the soil. I ordered a sensor from Amazon (via the Happy Store) with a gold plated fork (the gold should make it last longer by resisting corrosion).
I had a Netduino Plus 2 (NP2) sitting on my bench so I hooked up the moisture sensor to an analog port (A1) and started reading the sensor value. In this version of the .NET Micro Framework (4.2) you get a double value between 0.0 and 1.0; where 1.0 represents 100 percent of the 3.3 reference voltage. When I put the sensor in water I got a value of 0.6 which translates to about 2.0 volts (3.3V * 0.6 = 1.98) a little bit less than the specified value, but close enough.
I started off multiplying the value by 300 which gave me a full scale value of about 180 when the sensor was in plain water. When I stuck the sensor into the soil I would see a maximum of about 160 when I had just watered the plant and the plant started to look wilted at about 80.
After running with this for a while I decided that it would make more sense if the maximum (in water) value was calibrated to 100 (percent). Now I get about 88 when I water the plant and about 40 when it starts wilting.
You'll notice in the following code that I initialize a class variable with the conversion factor. In the future I plan to add the ability to bring up a menu on the display and select an option to calibrate this value with the sensor in water (that's how I got the number 165), since the value will probably vary from sensor to sensor.
using System;
using System.Threading;
using Microsoft.SPOT;
using Microsoft.SPOT.Hardware;
using SecretLabs.NETMF.Hardware;
using SecretLabs.NETMF.Hardware.NetduinoPlus;

namespace LymanTech.Article.PlantNannyPart1
{
public class Program
{
    // The conversion factor for the moisture readings.
    private static int m_Convert = 165;

    //=========================================================================
    // 1) Read and display the moisture level.
    //
    public static void Main()
    {
        int mVal;
        AnalogInput a1;

        // Setup for the main loop.
        a1 = new AnalogInput(AnalogChannels.ANALOG_PIN_A1);

        while (true) {
            // Get the moisture level from the sensor and adjust it.
            mVal = (int)(a1.Read() * m_Convert);

            // Display the data in the debugger output window.
            Debug.Print("Moisture = "   mVal);

            // Wait for one second and then do it all again.
            Thread.Sleep(1000);
        }
    }

}
}
LCD Display
Before I could take this into work I needed some sort of display. I had a basic 20x4 parallel LCD that I'd used before so I plugged it in and started displaying data. I've been using the MicroLiquidCrystal library. It works pretty well, but of course, I'm itching to write my own library.
You'll notice that LCD shows two values for the moisture level, we'll use this later. It also displays the current time, which is a bit strange since the Netduino always thinks that it's midnight on Jun 1, 2011 when is boots up. And it shows the IP address, if you don't have it hooked up to your network then that will be 0.0.0.0.
Don't forget to add a reference to the MicroLiquidCrystal library.
using System;
using System.Threading;
using Microsoft.SPOT;
using Microsoft.SPOT.Hardware;
using Microsoft.SPOT.Net.NetworkInformation;
using SecretLabs.NETMF.Hardware.NetduinoPlus;
using MicroLiquidCrystal;

namespace LymanTech.Article.PlantNannyPart1
{
public class Program
{
    // The conversion factor for the moisture readings
    private static int m_Convert = 165;

    // The LCD driver object.
    private static Lcd m_Lcd;

    //=========================================================================
    // 1) Read and display the moisture level.
    // 2) Write to the LCD.
    //
    public static void Main()
    {
        AnalogInput a1;
        int mVal;

        // Initialize the LCD.
        SetupLCD(20, 4);

        // Setup for the main loop.
        a1 = new AnalogInput(AnalogChannels.ANALOG_PIN_A1);

        while (true) {
            // Get the moisture level from the sensor and adjust it.
            mVal = (int)(a1.Read() * m_Convert);

            // Update the LCD display.
            UpdateLCD(mVal, mVal);

            // Wait for one second and then do it all again.
            Thread.Sleep(1000);
        }
    }

    //=========================================================================
    // Initialize the LCD driver object.
    private static void SetupLCD(byte width, byte lines)
    {
        GpioLcdTransferProvider lcdProvider;

        // Create an LCD transfer provider using the GPIO (general purpose
        // Input/Output) provider.  Initialize the provider with the pins
        // that we hooked up to the LCD display.
        lcdProvider = new GpioLcdTransferProvider(
            Pins.GPIO_PIN_D8,    // RS
            Pins.GPIO_PIN_D7,    // R/W
            Pins.GPIO_PIN_D6,    // ENABLE
            Pins.GPIO_PIN_D2,    // D4
            Pins.GPIO_PIN_D3,    // D5
            Pins.GPIO_PIN_D4,    // D6
            Pins.GPIO_PIN_D5);   // D7

        // Create the LCD object and set it up.
        m_Lcd = new Lcd(lcdProvider);
        m_Lcd.Begin(width, lines);
        m_Lcd.Clear();
    }

    //=========================================================================
    private static void UpdateLCD(int mVal, int raw)
    {
        NetworkInterface netInterface;

        // Display a string from the beginning of the first line.
        m_Lcd.SetCursorPosition(0, 0);
        m_Lcd.Write("Moisture: "   mVal   "   ");

        // Display a symbol that "rotates" each second in the last
        // character position of the first line.
        m_Lcd.SetCursorPosition(19, 0);
        m_Lcd.Write(((m_SamplePos % 2) == 0) ? "-" : "|");

        // Display the raw value, for debugging.
        m_Lcd.SetCursorPosition(0, 1);
        m_Lcd.Write("Raw: "   raw   "   ");

        // Skip a line and display the date and time on line 3.
        m_Lcd.SetCursorPosition(0, 2);
        m_Lcd.Write(DateTime.Now.ToString());

        // And finally display our IP address on line 4.
        m_Lcd.SetCursorPosition(0, 3);
        netInterface = NetworkInterface.GetAllNetworkInterfaces()[0];
        m_Lcd.Write("IP = "   netInterface.IPAddress);
    }

}
}
Stabilizing The Displayed Value
If you watch the moisture display for a while it doesn't take too long to realize that we need to stabilize the value from the moisture sensor; at this point we're sampling the moisture level once a second and it jumps all over the place. So I came up with an algorithm to take the last N samples, throw out the minimum and maximum values, and compute the average of the remaining samples. This does a pretty good job of smoothing out the data without going too far from the raw data (you can always do more smoothing later when you use the data).
I put the entire loop into a try-catch block so that if an error occurs it will be indicated in the last line of the display (for a second). The important thing is that we will never drop out of the main loop.
I also changed the main loop to only read the sensor once a minute. I don't really need to sample more than that, and reducing the sample rate should help the sensor last longer (60 times longer?). It's not as much fun to watch the display this way, but you can always comment out the IF check if you want to.
using System;
using System.Threading;
using Microsoft.SPOT;
using Microsoft.SPOT.Hardware;
using Microsoft.SPOT.Net.NetworkInformation;
using SecretLabs.NETMF.Hardware.NetduinoPlus;
using MicroLiquidCrystal;

namespace LymanTech.Article.PlantNannyPart1
{
public class Program
{
    // The conversion factor for the moisture readings
    private static int m_Convert = 165;

    // The LCD driver object.
    private static Lcd m_Lcd;

    //=========================================================================
    // 1) Read and display the moisture level.
    // 2) Write to the LCD.
    // 3) Add averaging to smooth the moisture level data.
    //
    public static void Main()
    {
        const int SampleCount = 7;

        AnalogInput a1;
        int averageCur = 0;
        int count = 0;
        DateTime curTime;
        int mVal = 0;
        int pPos = 0;
        int prevSecond = 0;
        int[] samples = new int[SampleCount];
        int sum = 0;
        int sVal = 0;

        // Initialize the LCD.
        SetupLCD(20, 4);

        // Setup for the main loop.
        a1 = new AnalogInput(AnalogChannels.ANALOG_PIN_A1);
        pPos = 0;
        count = 1;
        samples[pPos] = (int)(a1.Read() * m_Convert);
        sum = samples[pPos];

        while (true) {
            try {
                curTime = DateTime.Now;

                if ((curTime.Second < prevSecond) || (count < SampleCount)) {
                    // Get the moisture level from the sensor and adjust it.
                    mVal = (int)(a1.Read() * m_Convert);

                    // Update the average and get the smoothed value.
                    averageCur = DoAver(mVal, count, SampleCount, ref samples, ref pPos);

                    count  ;
                }

                // Update the LCD display.
                UpdateLCD(sVal, mVal);

                prevSecond = curTime.Second;
            } catch (Exception e) {
                m_Lcd.SetCursorPosition(0, 3);
                m_Lcd.Write("Exception: "   e.Message.Substring(0, 9));
            }

            // Wait for one second and then do it all again.
            Thread.Sleep(1000);
        }
    }

    //=========================================================================
    ///
    /// Do an average over the specified (aCount) number of data samples.
    ///
    /// The function computes a sum of the specified number of data samples
    /// dropping the minimum and maximum values.
    /// The new data point
    /// The total count of data points
    /// The size of the circular buffer
    /// The circular buffer used for averaging
    /// The buffer location to store the next value
    ///
    private static int DoAver(
        int rawDataVal,
        int count,
        int aCount,
        ref int[] aData,
        ref int aPos)
    {
        double aSum;
        double average;
        double max;
        double min;

        // Store the new value in the buffer, compute the average by adding
        // each point to the sum, subtract the min and max, divide by count-2.
        // If there are not enough points to average return the data point.
        aData[aPos] = rawDataVal;
        if (count >= aCount) {
            aSum = min = max = aData[0];
            for (int i=1; i < aCount; i  ) {
                if (aData[i] > max) {
                    max = aData[i];
                } else if (aData[i] < min) {
                    min = aData[i];
                }
                aSum  = aData[i];
            }
            average = (aSum - min - max) / (aCount - 2);
        } else {
            average = rawDataVal;
        }

        // Point to the next location in the buffer, to place the next value.
        aPos  ;
        if (aPos >= aCount) {
            aPos = 0;
        }
        return (int)average;
    }
}
}
Logging to an SD Card
Now that I've got some data I want to look at how the moisture level changes over time. That means saving the values somewhere. The Netduino Plus' have a socket for an SD card and they automatically mount the SD card as a file system. The SD card is fairly easy to use and since it's removable it provides a easy way to get the data on my laptop for graphing and other processing.
Note that whenever I write to the SD card I flush the data, this is the only way to insure that all of the data that's been written by the program is actually on the card and not held up in some memory buffer. Why is that important? Well, when I pop out the card to plug it into my laptop any data still in a memory buffer would be lost ... and that's not what I want. Also, if you remove the card you should press the reset switch after you reinsert the card, I've had it hang an hour or so after I reinserted the card, and the reset prevents that from happening.
The following code opens a file on the SD card and writes the averaged moisture value once per minute.
using System;
using System.IO;
using System.Threading;
using Microsoft.SPOT;
using Microsoft.SPOT.Hardware;
using Microsoft.SPOT.Net.NetworkInformation;
using SecretLabs.NETMF.Hardware.NetduinoPlus;
using MicroLiquidCrystal;

namespace LymanTech.Article.PlantNannyPart1
{
public class Program
{
    // The conversion factor for the moisture readings
    private static int m_Convert = 165;

    // The LCD driver object.
    private static Lcd m_Lcd;

    // The log file that we're writing data to.
    private static StreamWriter m_DataLog;

    //=========================================================================
    // 1) Read and display the moisture level.
    // 2) Write to the LCD.
    // 3) Add averaging to smooth the moisture level data.
    // 4) Log data to the SD card.
    //
    public static void Main()
    {
        const int SampleCount = 7;

        AnalogInput a1;
        int averageCur = 0;
        int count = 0;
        DateTime curTime;
        int mVal = 0;
        int pPos = 0;
        int prevSecond = 0;
        int[] samples = new int[SampleCount];
        int sum = 0;
        int sVal = 0;

        // Initialize the LCD.
        SetupLCD(20, 4);

        // Start the data log.
        m_DataLog = new StreamWriter("\\SD\\WaterLog.txt", true);
        m_DataLog.WriteLine("===== File opened ====");

        // Setup for the main loop.
        a1 = new AnalogInput(AnalogChannels.ANALOG_PIN_A1);
        pPos = 0;
        count = 1;
        samples[pPos] = (int)(a1.Read() * m_Convert);
        sum = samples[pPos];

        while (true) {
            try {
                curTime = DateTime.Now;

                if ((curTime.Second < prevSecond) || (count < SampleCount)) {
                    // Get the moisture level from the sensor and adjust it.
                    mVal = (int)(a1.Read() * m_Convert);

                    // Update the average and get the smoothed value.
                    averageCur = DoAver(mVal, count, SampleCount, ref samples, ref pPos);

                    // Output to the data log.
                    m_DataLog.WriteLine(curTime   ","   averageCur);
                    m_DataLog.Flush();

                    count  ;
                }

                // Update the LCD display.
                UpdateLCD(sVal, mVal);

                prevSecond = curTime.Second;
            } catch (Exception e) {
                m_Lcd.SetCursorPosition(0, 3);
                m_Lcd.Write("Exception: "   e.Message.Substring(0, 9));
            }

            // Wait for one second and then do it all again.
            Thread.Sleep(1000);
        }
    }

}
}
Networking and Network Time
As soon as you start generating log entries you'll see that you need a date/time value for each entry. The Netduino Plus' maintain a real-time value, but when they boot up they don't know what the current time is. We could enter the time if we some sort of keypad, but since the Netduino Plus' support an Ethernet connection, we're going to get the time from a time server.
When the Netduino boots up it automatically goes out and requests an IP address from your DHCP server. Before I try to use the network I check to make sure that I have an IP address, If I don't have an IP address then the Netduino is not connected to the network. It's a good idea to check this now so that we don't hang up later when we try to use the network. You'll also notice some ugly reflection code (don't forget the reference). We need to set the network socket to non-blocking (that means don't wait if it can't connect) or it will hang forever if the server doesn't respond.
We're going to use the simplest of the three major time server protocols the TIME protocol. All that we have to do is open a TCP connection to one of the NIST servers provided on the internet and it will send us 4 bytes of data. The 32 bit value we receive contains the number of seconds since 00:00.00 on January 1, 1900 GMT. The code will show you how to convert that value into a C# DateTime object.
Once we know the current data and time, the last thing we want to do is set the Netduino's clock. And of course, we display the time on the display updating it once per second.
using System;
using System.IO;
using System.Net;
using System.Net.Sockets;
using System.Reflection;
using System.Threading;
using Microsoft.SPOT;
using Microsoft.SPOT.Hardware;
using Microsoft.SPOT.Net.NetworkInformation;
using SecretLabs.NETMF.Hardware.NetduinoPlus;
using MicroLiquidCrystal;

namespace LymanTech.Article.PlantNannyPart1
{
public class Program
{
    // The conversion factor for the moisture readings
    private static int m_Convert = 165;

    // The LCD driver object.
    private static Lcd m_Lcd;

    // The log file that we're writing data to.
    private static StreamWriter m_DataLog;

    // Time zone Offset, CST=-6, Add 1 for Daylight Savings Time.
    private static int m_TimeZoneOffset = -6   1;

    //=========================================================================
    // 1) Read and display the moisture level.
    // 2) Write to the LCD.
    // 3) Add averaging to smooth the moisture level data.
    // 4) Log data to the SD card.
    // 5) Get the current time from a network time server.
    //
    public static void Main()
    {
        const int SampleCount = 7;

        AnalogInput a1;
        int averageCur = 0;
        int count = 0;
        DateTime curTime;
        int mVal = 0;
        int pPos = 0;
        int prevSecond = 0;
        int[] samples = new int[SampleCount];
        int sum = 0;
        int sVal = 0;

        // Initialize the LCD.
        SetupLCD(20, 4);

        // Start the data log.
        m_DataLog = new StreamWriter("\\SD\\WaterLog.txt", true);
        m_DataLog.WriteLine("===== File opened ====");

        // Wait until we have an IP Address to continue.
        m_Lcd.SetCursorPosition(0, 3);
        m_Lcd.Write("Getting IP Adress...");
        WaitForIPAddress();

        // Initialize the current date and time.
        m_Lcd.SetCursorPosition(0, 3);
        m_Lcd.Write("Calling Time Server ");
        UpdateTime(m_TimeZoneOffset, true);

        // Setup for the main loop.
        a1 = new AnalogInput(AnalogChannels.ANALOG_PIN_A1);
        pPos = 0;
        count = 1;
        samples[pPos] = (int)(a1.Read() * m_Convert);
        sum = samples[pPos];

        // Main loop runs once per second.
        while (true) {
            try {
                curTime = DateTime.Now;

                // We process the data once per minute.
                if ((curTime.Second < prevSecond) || (count < SampleCount)) {
                    // Get the moisture level from the sensor and adjust it.
                    mVal = (int)(a1.Read() * m_Convert);

                    // Update the average and get the smoothed value.
                    averageCur = DoAver(mVal, count, SampleCount, ref samples, ref pPos);

                    // Output to the data log.
                    m_DataLog.WriteLine(curTime   ","   averageCur);
                    m_DataLog.Flush();

                    count  ;
                }

                // Update the LCD display.
                UpdateLCD(sVal, mVal);

                // Update the time from the network once a day.
                UpdateTime(m_TimeZoneOffset, false);

                prevSecond = curTime.Second;
            } catch (Exception e) {
                m_Lcd.SetCursorPosition(0, 3);
                m_Lcd.Write("Exception: "   e.Message.Substring(0, 9));
            }

            // Wait for one second and then do it all again.
            Thread.Sleep(1000);
        }
    }

    //=========================================================================
    // Note: time.nist.gov = 132.163.4.102
    // Use a non-blocking connect, if we don't connect then Receive() will
    // return a count of zero and we will use the default data in the array.
    public static void UpdateTime(int timeZone, bool force)
    {
        const int TIME_PORT = 37;

        FieldInfo blockingField;
        DateTime  curTime = DateTime.Now;
        DateTime  date;
        long      rawDate;
        byte[]    resp;
        Socket    socket;
        long      timeBase = new DateTime(1900, 1, 1).Ticks;

        // Just return if it's not the right time (we only update once a day).
        if (!force
        && ((curTime.Hour != 23) || (curTime.Minute != 59) || (curTime.Second != 30))) {
            return;
        }

        IPEndPoint iep = new IPEndPoint(IPAddress.Parse("132.163.4.102"), TIME_PORT);
        socket = new Socket(AddressFamily.InterNetwork, SocketType.Stream, ProtocolType.Tcp);
        Type sType = Type.GetType("System.Net.Sockets.Socket");
        blockingField = sType.GetField("m_fBlocking",
            BindingFlags.NonPublic | BindingFlags.Instance);
        blockingField.SetValue(socket, false);

        try {
            socket.Connect(iep);
        } catch (SocketException) {
        }

        // Receive the data, if we didn't connect then we just use
        // the default data of zero.
        resp = new byte[4] { 0, 0, 0, 0 };
        socket.Receive(resp);

        rawDate = (long)(resp[0] << 24)   (long)(resp[1] << 16)
              (long)(resp[2] << 8)   (long)resp[3];
        rawDate &= 0xFFFFFFFF;
        date = new DateTime(timeBase   (long)(rawDate * 10000000));

        socket.Close();

        // Adjust for the specified time zone.
        TimeSpan offsetAmount = new TimeSpan(0, timeZone, 0, 0, 0);
        date  = offsetAmount;

        // Set the date and time.
        Utility.SetLocalTime(date);

        // If the clock was set back in wait here until the clock catches
        // up to where it was before.
        int tChange = curTime.Second - DateTime.Now.Second;
        if ((tChange > 0) && (tChange < 20)) {
            Thread.Sleep(tChange * 1000);
        }
        Debug.Print("Update time: "   tChange);

    }

    //*************************************************************************
    ///
    /// This function wait until we get an IP address from DHCP.
    ///
    ///  Our IP address as a string, NULL if not connected
    public static String WaitForIPAddress()
    {
        int count = 5;
        String myAddr = NetworkInterface.GetAllNetworkInterfaces()[0].IPAddress;

        while (myAddr.Equals("0.0.0.0") && (count > 0)) {
            Thread.Sleep(1000);
            myAddr = NetworkInterface.GetAllNetworkInterfaces()[0].IPAddress;
            count--;
        }

        if (myAddr.Equals("0.0.0.0")) {
            return null;
        } else {
            return myAddr;
        }
    }

}
}
Power Over Ethernet (POE)
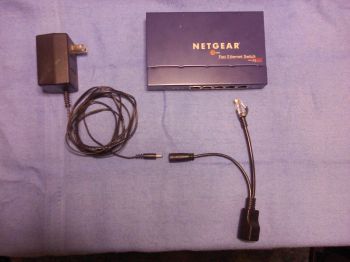
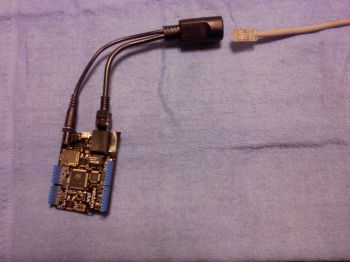
Instead of running two wires over to the Plant Nanny (network plus power) I wanted to run the power over the Ethernet cable using POE. There are a lot of ways to do this, some of them are very expensive. I wanted a simple way to get 9 volts DC to the Netduino, but the official standard specifies 48 volts DC, which means that I would have to step the voltage down before powering the Netduino, which is another box I'd have to buy. The official POE routers and injectors support all speeds of Ethernet (10Mbps, 100Mbps, and 1000Mbps), the lower two speeds only use 4 of the wires on the Ethernet cable so POE in those cases simply puts the power on the normally unused wires. This is perfect for the Netduino since it doesn't support 1000Mbps anyways.
As I searched the web for solutions I found the Y-cables shown below, and it seemed like the perfect solution for this situation! I bought a pair and hooked it up as shown. I plugged it into my 1000Mbps switch and it works great. The switch only uses 4-wires when talking to the Netduino and the Y-cable isolates the switch from the 9 volt power.
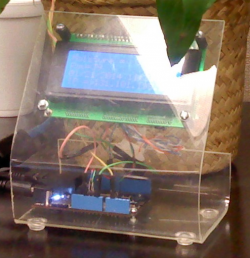
A Simple Stand
I was talking to a co-worker about using Plexiglas for project boxes, and I remembered a project I did in high school (many years ago). I was a simple electronics project and we bent a sheet pf Plexiglas to make a stand for the display. I thought that this would be perfect for the Plant Nanny. I'll do a blog entry later to talk about how I made the stand. Here's a picture of the first prototype.
Thoughts For The Future
I've got lots of ideas for future enhancements of this project. Here are some of the possibilities:
- Add some buttons and a configuration menu.
- Add sensors to monitor temperature, relative humidity, and light levels.
- Make it a network server so that I can read data over the network.
- Send alerts to my cell phone as text messages (via the network).
- Add a pump so that it can water my plant automatically.
John Lyman
Please add your bio info through your member profile page, or through your dashboard.
Add Pingback